
If you have followed previous two posts on creating AKS cluster and connecting to AKS cluster, you should be having an accessible Kubernetes cluster. In this post, we will cover how to deploy application on AKS. We will use simple voting application from Microsoft document. This link gives full YAML file. Here I will try to explain different parts of this code.
Instead of using one single YAML file, I have segregated it into multiple files. You can clone the code files from GitHub.
git clone https://github.com/praveen-krg/cloudiseasy-aks.git cloudiseasy-aks-basicsYou should be able to find required files in folder named simple-vote-app. I have divided it into 4 files – frontend deployment, frontend service, backend deployment and backend service.
I guess you’re in hurry to deploy application on AKS. Lets do that first and then dig into YAML code.
Deploy Application on AKS
By now, you should be having kubectl installed. If not, follow this link. Run following commands:
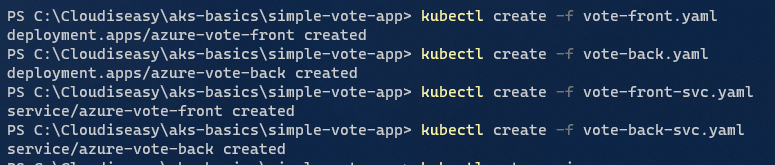
kubectl create -f vote-back.yaml
kubectl create -f vote-back-svc.yaml
kubectl create -f vote-front.yaml
kubectl create -f vote-front-svc.yaml
Remember, you always keep everything in one single file and deploy it. I personally recommend getting used to multiple files since it’s much easier to work with Helm charts this way. We will get to Helm charts in our future posts. Your outcome should be something similar to mine:
Kubectl create uses the file mentioned after -f and creates the respective resource mentioned in the file. Using kubectl apply is a better option compared to kubectl create. In order to understand the difference run the same command again. It will throw and error stating “Error from server (AlreadyExists): error when creating “vote-front-svc.yaml”: services “azure-vote-front” already exists”. This can be avoided using kubectl apply command. It can be used to deploy resources that don’t yet exist or to redeploy modified code.
Validate Application Deployment
From above output, we could see that our app deployments and services went through successfully. Time to check what were deployed in our cluster.
Check Pods
Run following command:
kubectl get pods
We see both front-end and back-end deployed. If STATUS shows up as ContainerCreating, hold on for a couple of seconds and try again. Alternatively you watch the progress as well using –watch. Add –watch at the end of your command to follow the status. You can check further details by describing them. Use kubectl describe for this purpose.
# Syntax is kubectl describe <resource> <resource-name>
kubectl describe pod azure-vote-back-5f46f8f4cc-4xjr8
You would get long output. This would include details of the containers deployed, volumes, node and events (among many other details) associated with the pod. Here’s my output:
Name:         azure-vote-back-5f46f8f4cc-4xjr8
Namespace:    default
Priority:     0
Node:         aks-nodepool1-19593774-vmss000000/10.240.0.4
Start Time:   Sat, 26 Jun 2021 17:46:34 +0530
Labels:       app=azure-vote-back
              pod-template-hash=5f46f8f4cc
Annotations:  <none>
Status:       Running
IP:           10.244.0.15
IPs:
  IP:           10.244.0.15
Controlled By:  ReplicaSet/azure-vote-back-5f46f8f4cc
Containers:
  azure-vote-back:
    Container ID:   containerd://647bc01d2b9ec2c9620c1c2e127b94042017ce33c4cc95723e99f781f282a6d5
    Image:          mcr.microsoft.com/oss/bitnami/redis:6.0.8
    Image ID:       mcr.microsoft.com/oss/bitnami/redis@sha256:9b53ae0f1cf3f7d7854584c8b7c5a96fe732c48d504331da6c00f892fdcce102
    Port:           6379/TCP
    Host Port:      0/TCP
    State:          Running
      Started:      Sat, 26 Jun 2021 17:46:45 +0530
    Ready:          True
    Restart Count:  0
    Limits:
      cpu:     250m
      memory:  256Mi
    Requests:
      cpu:     100m
      memory:  128Mi
    Environment:
      ALLOW_EMPTY_PASSWORD:  yes
    Mounts:
      /var/run/secrets/kubernetes.io/serviceaccount from default-token-g8rxx (ro)
Conditions:
  Type              Status
  Initialized       True
  Ready             True
  ContainersReady   True
  PodScheduled      True
Volumes:
  default-token-g8rxx:
    Type:        Secret (a volume populated by a Secret)
    SecretName:  default-token-g8rxx
    Optional:    false
QoS Class:       Burstable
Node-Selectors:  beta.kubernetes.io/os=linux
Tolerations:     node.kubernetes.io/memory-pressure:NoSchedule
                 node.kubernetes.io/not-ready:NoExecute for 300s
                 node.kubernetes.io/unreachable:NoExecute for 300s
Events:
  Type    Reason     Age        From                                        Message
  ----    ------     ----       ----                                        -------
  Normal  Scheduled  <unknown>                                              Successfully assigned default/azure-vote-back-5f46f8f4cc-4xjr8 to aks-nodepool1-19593774-vmss000000
  Normal  Pulling    66m        kubelet, aks-nodepool1-19593774-vmss000000  Pulling image "mcr.microsoft.com/oss/bitnami/redis:6.0.8"
  Normal  Pulled     66m        kubelet, aks-nodepool1-19593774-vmss000000  Successfully pulled image "mcr.microsoft.com/oss/bitnami/redis:6.0.8" in 3.687445878s
  Normal  Created    66m        kubelet, aks-nodepool1-19593774-vmss000000  Created container azure-vote-back
  Normal  Started    66m        kubelet, aks-nodepool1-19593774-vmss000000  Started container azure-vote-back
Validate Service
You can similarly check details of other pods as well. Along with the apps layer we also deployed something call “service“. Our application needs to be exposed publicly so that we could access it. Here, we have created service and it, internally, creates an Azure Load Balancer with public IP. To check the public IP, run following kubectl get command.
kubectl get service azure-vote-frontYou see an output similar to:
NAME               TYPE           CLUSTER-IP    EXTERNAL-IP     PORT(S)        AGE
azure-vote-front   LoadBalancer   10.0.74.189   52.154.212.91   80:30754/TCP   76m
This means that our service has successfully deployed and our app is exposed on a public IP (shown in above result).
Check all resources
Just run following command and it will show all the resources present in your cluster:
kubectl get all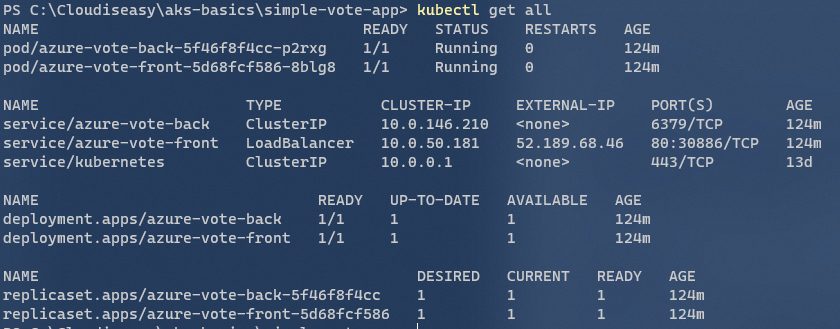
Remember, this command just show you resourced from your current namespace. Provided that you have followed the exact same steps from this “AKS Basics” series, you must be using default namespace. Yes, name of default namespace is default. If you want to go a step beyond and check all resources from all namspaces, just add -A at the end of above command (for that matter, most of other commands we used till now).
Validate Deployed Application From Browser
Once you know the public IP, use that to browse to the application in your browser. You should see and output similar to below one:
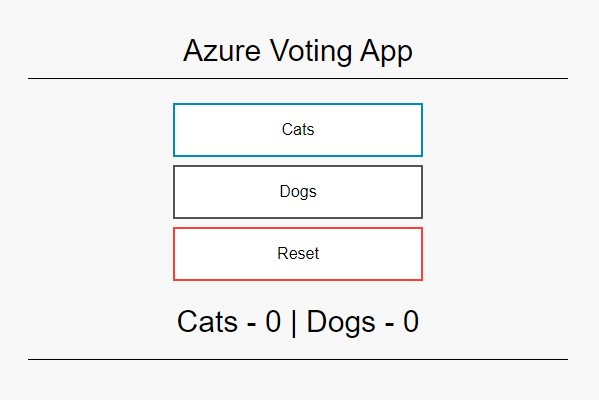
If you have followed all the steps mentioned above, you should have above result. However, there is always possibility of something going wrong.
Quick Troubleshooting
If you don’t see above result. You can check your pods and services again to see if they are still in good shape.
# Get all pods fron current namespace.
kubectl get pods

# Get all services from current namespace.
# Yes, I typed just typed svc. I am lazy!
kubectl get svc
If everything looks good, check for logs from the pods. Here’s how to quickly get logs from Kubernetes pods.
# Get all pods
kubectl get pods

# Copy the name of the pod you want to fetch logs from and use it in below command
kubectl logs <pod_name>
This should help you narrow down on the issue. If you still thinking logging into the container and running any shell commands would help, you can easily do it.
# Get all pods. Yes! I used po and it's not a typo.
# You can just type po instead of pods.
kubectl get po

# Enter container shell
# Replace <pod_name> with pod name from above command.
kubectl exec -it <pod_name> -- sh
Depending on the error, further troubleshooting can be carried out. For now, lets stick with only these commands.
Understanding YAML File
Lets take a quick look at the YAML files – 1 service and 1 app deployment. Lets start with frond end deployment.
Deployment YAML
     1  apiVersion: apps/v1
     2  kind: Deployment
     3  metadata:
     4    name: azure-vote-front
     5  spec:
     6    replicas: 1
     7    selector:
     8      matchLabels:
     9        app: azure-vote-front
    10    template:
    11      metadata:
    12        labels:
    13          app: azure-vote-front
    14      spec:
    15        nodeSelector:
    16          "beta.kubernetes.io/os": linux
    17        containers:
    18        - name: azure-vote-front
    19          image: mcr.microsoft.com/azuredocs/azure-vote-front:v1
    20          resources:
    21            requests:
    22              cpu: 100m
    23              memory: 128Mi
    24            limits:
    25              cpu: 250m
    26              memory: 256Mi
    27          ports:
    28          - containerPort: 80
    29          env:
    30          - name: REDIS
31 value: "azure-vote-back"- Line 1 and 2: They mention the API version and the kind as deployment. Deployments can be used to update pods and your replicasets.
- Line 3 and 4: These lines contain metadata for the deployment.
- Line 6: Mentions the number of replica we want. In our case we just did 1. Change this number and see the difference for yourself. However, we will cover these in depth later as well.
- Line 7 – 9: Selector is used to identify a set of objects. In our case, containers matching the label would managed by our deployment.
- Line 11 – 13: This mentions the labels. If you notice, the labels match with that of label selector. Hence, we see this deployment managing these containers. These labels will be used to group and connect to other pods as well.
- Line 14 – 16: We are using nodeSelector to select node with a Linux OS.
- Line 17 – 19: We are giving a name to our container. In line 19, we are telling it from where it could fetch the image for the container.
- Line 20 – 26: Kubernetes will reserve the resources we mentioned. Limits are the cap of each of those resources. One cpu unit is equivalent to 1 vCPU/core. Here we are allocating 100 millicores (0.1 cpu). It can go upto 250 millicores (0.25 cpu) before it is throttled. We are also allocating 128 Mi (mebibytes) and go upto 256 Mi before it reboots the pod.
- Line 27 – 28: The port on which our container would be listening on.
- Line 29 – 31: These are optional environment variables for the container. Don’t confuse yourself! These are pretty much similar to how you have environment variables on your device or a Linux machine. If your application doesn’t use any, you can skip it. But, in real-time scenarios, it is almost impossible to not use environment variables at all.
Service YAML
Now, that you understand the deployment YAML, lets take a look at service.
     1  apiVersion: v1
     2  kind: Service
     3  metadata:
     4    name: azure-vote-front
     5  spec:
     6    type: LoadBalancer
     7    ports:
     8    - port: 80
     9    selector:
10 app: azure-vote-front- Line 2: It suggest that we are deploying a service. Service is used to expose pod to outside world or other pods (depending on what you intend to do).
- Line 3 – 4: Metadata for your service.
- Line 5 – 6: We are mentioning the type for the service. In this case we will be creating a LoadBalancer.
- Line 7 – 8: This mentions the incoming port for the service. Our service is taking traffic on port 80.
- Line 9 – 10: We are telling what are the pods this would be exposing. In our case, we know that label belongs to front-end deployment.
You can easily go through other 2 files on your own and explore a bit.
Cleanup AKS Cluster
By now, you should be good to deploy application on AKS cluster on your own. If you’re done with your testing, lets cleanup our cluster. Kubectl delete will get the work done.
kubectl delete -f vote-back.yaml
kubectl delete -f vote-back-svc.yaml
kubectl delete -f vote-front.yaml
kubectl delete -f vote-front-svc.yaml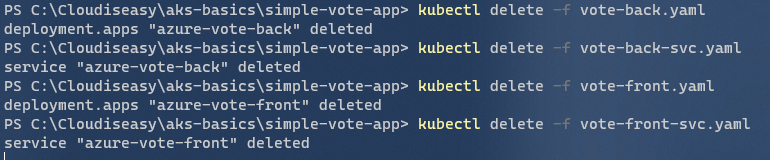
Next Steps
Now that you know how to deploy a simple application on AKS, next we will tackle a something that little more complex.
Meanwhile, if you’ve any queries, questions or stuck with troubleshooting, post them in comments section.