
This article will be long, but also explanatory of some concepts that are often misunderstood by many. Today I want to tell you about OAuth 2.0, OpenID Connect and JSON Web Tokens and what is what.
Why do these technologies appear?
They appear because of the need to access a resource (API) on your behalf. This service may belong to the company where you work or perhaps to another where you are a client / user. The scenarios or objectives to be achieved can be of all kinds. To give you an idea, here are few examples:
- Make a publication in your name on a social network (on Twitter, Facebook, Instagram, etc.).
- Email someone on your behalf.
- Recover your bank movements.
However, it is important that you know how to differentiate that knowing who you are is not same as what you can do. Authentication and authorization come into play here.
Authentication and authorization
Before talking about OAuth 2.0 and OpenID Connect it is important to be clear about what authentication and authorization is.
Authentication is the process of verifying an identity, that is, confirming that a person is who they say they are. Normally, to verify this fact, the user uses something they know to prove their identity, such as a username and password.
On the other hand, authorization is the process of verifying what a user can do. For example, a user can add songs to a shared Spotify playlist, but cannot remove that playlist. Authorization occurs after a user has authenticated.
Authentication and authorization methods before OAuth
To understand why OAuth appeared, I think it is important that you know what we used before this, and thus understand its need. The most common methods to authenticate yourself and manage authorization in APIs was directly sharing the username and password (Credential Sharing), using cookies and through API Keys. There are more options, of course, but these are the most common ones.
Share username and password
Until a while back, the way to perform authentication was by sharing the username and password with the service that needs to act on your behalf. The problem in this scenario is that we are acting exactly as an end user, which is called impersonation. In this case, we have no way to restrict access to certain parts of our API, that is, we cannot delegate only certain permissions to the application that is acting for us. Imagine today, where countless applications want to carry out some actions with your Facebook profile, normally post on your wall and get your friends list. If we used this system we would give him access to absolutely do everything, and he could recover private conversations, our photos, follow people we don’t want to, delete friends that we do want – you have an idea, right?
Cookies
In this case, if the authentication has been successful, the system will give us a cookie. This will allow access to the resource or API. The main problem in using these is the Cross-Site Request Forgery (CSRF or XSRF). If the user opens another tab in the browser and the user accesses the same site, you will realize that you can continue accessing without problems. What it means is that we are giving you access to the entire browser, not just to our tab where the web application that consults our information is. So an attacker could inject code into our HTML that calls our service and, without our consent, could carry out tasks on our behalf.
API Keys
This is an option that we can see frequently today. We access the resources using a key as the authentication method. They normally have an expiration time that allows us to prevent the keys from working indefinitely.
The problem with API Keys is that they usually give you full access to all the operations that the API can perform (read data, create it, delete it). In addition, API Keys do not allow users to be identified, they identify projects. Nor is there a standard that regulates how these keys should be.
OAuth 2.0
OAuth was built specifically to access APIs through HTTP. The user delegates to the application the ability to perform certain actions on their behalf. It is important to emphasize that OAuth is a framework for authorization, not authentication.
In OAuth 2.0 we work with these 4 parts:
- Protected Resource: The resource we want to access, an API.
- Client: The application that wants to access the resource that is protected, on behalf of someone. This client can be a web, mobile, desktop application for Smart TV, an IoT device, etc.
- Resource Owner: This is the user. It is called the owner of the resources because, although the API is not yours, the data it handles is.
- Authorization server: is responsible for managing authorization requests.
The way these 4 parts relate to each other is as follows:
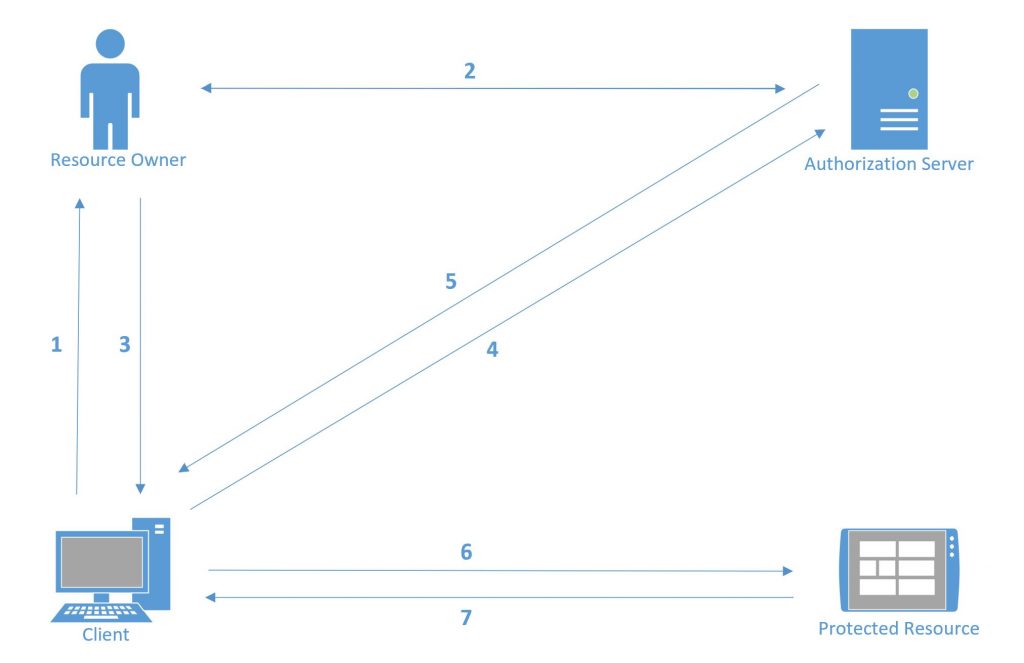
- The application asks the user to authenticate.
- For this, it is redirected to the authorization server for identification. This can be achieved through username and password, through facial recognition, voice recognition, it can have a second authentication factor or it can even be allowed access through other user accounts, such as Google, Facebook, Amazon , etc. Whatever it takes to verify your identity. Once the user is validated, he must agree with what the application wants to do (this is called consent). Usually a list of the permissions that the application is requesting is displayed.
- When the user’s identity is successfully validated, and the user has consented to what is wanted with this authorization, the user is redirected back to the client application. It gives this a code confirming that after the user has authenticated, it authorizes him to do things for him in the protected resource.
- The client application makes a request to the authorization server, with the permission that the user has given it, in addition to some data that identifies the application so that it is verified that it is a valid client to access the proposed resources.
- If all goes well, the authorization server will respond with an access token.
- With this access token the client application will be able to make calls to the API that it needs to access to carry out its task.
- When the protected resource receives the access token, it needs to verify it in some way. Once validated, it will check if the user has the permissions for which the request was made and, if everything is ok, the API will respond with the data that has been requested.
OpenID Connect
After having reviewed OAuth and the different flows we have to obtain a token, we can see that it is not perfect and that it lacks some needs. For example:
- It’s just an authorization framework
- Not able to identify users
OpenID Connect is intended for authentication and OAuth for authorization. This adds the following functionalities that complement OAuth:
- A token ID that allows us to know who the user is.
- A new endpoint, UserInfo, that allows us to retrieve more user information.
- A set of standard scopes.
- A set of claims that allows us to obtain data from the subject.
Token id
The moment you add OpenID Connect to your OAuth 2.0 flow, the response will be similar to the following:
{
    "access_token": "fJKUHFyhrTb60BhUj7dg",
    "id_token": "jkhjHVB6Jbj..."
    "expires_in": 3920,
    "token_type": "Bearer",
}
As you can see, in addition to the access token that we have been recovering with OAuth 2.0, thanks to OpenID Connect we have a new token called id token. This will provide us with information about the user from whom we are receiving authorization. This information comes in JWT or JSON Web Token format, which is a standard, which aims to securely transmit information between two parties in JSON format. This information is digitally signed and can be verified .
The token structure in this format consists of three parts separated by dots, something like this: aaaaaaa.bbbbb.ccccc. Each part means the following:
The header, which normally has two parts: the type of token and the algorithm that has been used to be signed. This can be HMAC SHA256 or RSA.
The payload, this is the part that contains the claims, basically the rights, that a user has. There are also usually other types of additional claims. This payload is in Base64 and forms the second part of the token
The signature: This part is used to verify that the message has not been modified during the sending and, in the case of tokens that have been signed with a private key, it can also verify that the issuer of the token is who it claims to be.
The result of all this is three Base64-URL encoded strings that can be easily sent through a web environment and is much more compact compared to the XML we came from.
There are different pages to decode and validate this type of tokens. Perhaps the most famous is Auth0’s jwt.io, but there are others as well.
UserInfo
Once you have a token ID you can use it to retrieve more information about the user.
Standard scopes set
OpenID Connect defines a series of standard scopes, which are as follows:
- openid: It is required to use OpenID Connect this is required.
- profile: Requests the following user claims: name, family_name, given_name, middle_name, nickname, preferred_username, profile, picture, website, gender, birthdate, zoneinfo, locale, and updated_at.
- email: Requests access to the user’s email and verified email.
- address: Retrieves the claim that contains the user’s address.
- phone: Retrieve the user’s phone and verified phone.
Just as there is a set of standard scopes, there is also a set of standard claims.
Hybrid Flow
OpenID Connect also supports a new flow called Hybrid Flow. It is a combination of Authorization Code Flow and Implicit Flow. Depending on the response_type you request, you will be able to retrieve some tokens from the authorization endpoint and others from the endpoint token. This type is used when you want the user to have immediate access to the identity token (id_token), but you also want to make calls to the back end to exchange an authorization code for an access token. The type of response must have the code type and any of the following combinations:
- response_type = code token
- response_type = code id_token
- response_type = code id_token token
Summary
OAuth 2.0 is for authorization and OpenID Connect is for authentication.
What flow should you follow?
- Applications with back end: Authorization Code Flow.
- Web applications without back end: Implicit Flow or Hybrid Flow.
- Native applications: Authorization Code flow with PCKE.
- Applications without users: Client Credentials Flow.
- Devices without browser: OAuth Device Flow
I hope this article has helped you understand OAuth 2.0, OpenID Connect and JWT.